Friday, November 19, 2021

How To Install SQL Server Management Studio 2019

 In this article, I am going to explain how to install SQL Server Management Studio 2019 step-by-step. The latest version of SQL Server Management Studio (SSMS) is 18.8 released on December 17, 2020. 

The SQL Server Management Studio is software for querying, designing, and managing SQL Server on your local computer or in the cloud. It provides you with tools to configure, monitor, and administer SQL Server instances.

 
Note
Azure Data Studio is automatically installed alongside SQL Server Management Studio (SSMS) in the latest version 18.8. Azure Data studio is a cross-platform and open-source desktop tool for your environments, whether in the cloud, on-premises, or hybrid.
 

Install Microsoft SQL Server Management Studio

 
Step 1
 
To install SQL Server Management Studio 2019, you need to download it from this link.
 
How To Install SQL Server Management Studio 2019
 
Step 2
 
Click the "Download" button for downloading the SSMS 2019 executable file on the downloaded path.
 
How To Install SQL Server Management Studio 2019
 
Step 3
 
Open your system download path and find the .exe file. SSMS-Setup-ENU.exe
 
How To Install SQL Server Management Studio 2019
 
Step 4
 
Double-click the .exe file SSMS-Setup-ENU.exe to starting installing. The installation process of SMSS is straightforward which you just need to follow the screen sequence.
 
How To Install SQL Server Management Studio 2019
 
Step 5
 
After double-clicking, the system will ask the permission: “Do you want to allow the following to make a change to this computer? Click yes to continue installing the SQL Server Management Studio 2019, or...
 
Click “Yes” on any security prompt.
 
Step 6
 
The installation window will be open after giving permission to install. Click the Install button.
 
How To Install SQL Server Management Studio 2019
 
Step 7
 
After loading packages progress bar will be shown. One is Package Progress and Overall Progress. Wait for few minutes while the installer sets up the software.
 
How To Install SQL Server Management Studio 2019
 
How To Install SQL Server Management Studio 2019
 
Step 8
 
Installation completed. After completing the installation restart your computer for a complete setup.
 
How To Install SQL Server Management Studio 2019
 
Step 9
 
Go to all programs in your systems, we can see two folders one is Microsoft SQL Server 2019 and another one is Microsoft SQL Server Tool 2018. Under Microsoft SQL Server Tools 18 you can see the Microsoft SQL Server Management Studio 18.
 
How To Install SQL Server Management Studio 2019
 
Step 10
 
Double-click on SQL Server Management Studio 18 and it will open looks like the below screenshot. The first time opening it will take a few minutes.
 
How To Install SQL Server Management Studio 2019
 
After opening SQL Server Management Studio 2018, we can see that it looks like the below screenshot.
 
How To Install SQL Server Management Studio 2019
 
Now we can connect to the server and use SQL Server Management Studio 2019.

How To Install SQL Server 2019

 In this article, I am going to explain how to install the SQL Server 2019 Developer Edition and SQL Server Management Studio (SSMS) step by step. The latest version of SQL Server is 2019 and the latest version of SQL Server Management Studio (SSMS) is 18.8 released on December 17, 2020. Developer Edition is free.


MS SQL Server- Editions

 
There are 4 different types of editions available in SQL Server 2019.
  • Enterprise –  It has more features than any other edition

    • It is the top-end edition
    • Production use
    • License cost

  • Standard – Production use

    • License cost
    • It has fewer features than Enterprise

  • Express –  Free software/free to download and install

    • It has 10 GB size limit, only used for small applications.

  • Developer – Free software/free to download and install
      • Developer is the same as Enterprise
      • But for non-production use.
      • It is used to learn, build and test.
    I am using SQL Server 2019 Developer Edition because it is free software/free to download and install.
     

    Install SQL Server 2019 Developer Edition

     
    Step 1
     
    To install SQL Server 2019, you need to download it from this link.
     
    How To Install SQL Server 2019 
     
    Step 2
     
    Click the "Download" button for downloading the SQL Server 2019 executable file.
     
    How To Install SQL Server 2019 
     
    Step 3
     
    Open your systems download path and find the .exe file. SQL2019-SSEI-Dev.exe
     
    How To Install SQL Server 2019 
     
    Step 4
     
    Double-click the exe file SQL2019-SSEI-Dev.exe to start installing.
     
    How To Install SQL Server 2019 
     
    Step 5
     
    After double clicking, the system will ask the permission: “Do you want to allow the following to make a change this computer? Click yes to continue installing the SQL Server 2019. Or Click “Yes” on any security prompt.
     
    Step 6
     
    The installer asks you to select the installation type, choose the Basic installation type.
     
    How To Install SQL Server 2019 
     
    Step 7
     
    Accept Microsoft license terms, then click the Accept button.
     
    How To Install SQL Server 2019 
     
    Step 8
     
    Click the Install button. The installer automatically downloads and installs SQL Server.
     
    How To Install SQL Server 2019 
     
    Step 8
     
    After loading packages progress bar will be shown. Wait for a few minutes while the installer downloads and installs packages.
     
    How To Install SQL Server 2019
     
    How To Install SQL Server 2019
     
    How To Install SQL Server 2019
     
    Installation completed for Database Engine.
     
    Congratulations!!! You have successfully installed SQL Server 2019 Developer Edition.
     
    Now install other software called SQL Server Management Studio
     

    Install Microsoft SQL Server Management Studio

     
    Step 1
     
    Click Install SSMS button to Download and install SQL Server Management Studio
     
    How To Install SQL Server 2019
     
    Step 2
     
    Then page redirects to Microsoft Download page, you need to download it from this link.
     
    How To Install SQL Server 2019 
     
    Step 3
     
    Click the "Download" button for downloading the SSMS 2019 executable file on the downloaded path.
     
    How To Install SQL Server 2019 
     
    Step 4
     
    Open your systems download path and find the .exe file. SSMS-Setup-ENU.exe
     
    How To Install SQL Server 2019 
     
    Step 5
     
    Double-click the exe file SSMS-Setup-ENU.exe to starting installing. The installation process of SMSS is straightforward which you just need to follow the screen sequence.
     
    How To Install SQL Server 2019 
     
    Step 6
     
    After double clicking, the system will ask the permission: “Do you want to allow the following to make a change on this computer? Click yes to continue installing the SQL Server Management Studio 2019. Or Click “Yes” on any security prompt."
     
    Step 7
     
    Installation window will be open after giving permission to install. Click the Install button.
     
    How To Install SQL Server 2019 
     
    Step 8
     
    After loading packages progress bar will be shown. One is Package Progress and Overall Progress. Wait for few minutes while the installer sets up the software.
     
    How To Install SQL Server 2019
     
    How To Install SQL Server 2019 
     
    Step 9
     
    Installation completed. After completing the installation restart your computer for complete setup.
     
    How To Install SQL Server 2019 
     
    Step 10
     
    Go to all programs in your systems, we can see two folders, one is Microsoft SQL Server 2019 and another one is Microsoft SQL Server Tool 2018. Under Microsoft SQL Server Tools 18 you can see the Microsoft SQL Server Management Studio 18.
     
    How To Install SQL Server 2019 
     
    Step 11
     
    Double-click on SQL Server Management Studio 18 and it will open looks like below screenshot. The first opening will take a few minutes.
     
    How To Install SQL Server 2019
     
    How To Install SQL Server 2019 
     
    After opening SQL Server Management Studio 2018, we can see it looks like the below screenshot.

    Install SQL Server 2019 on Windows 10

     Step 1: 

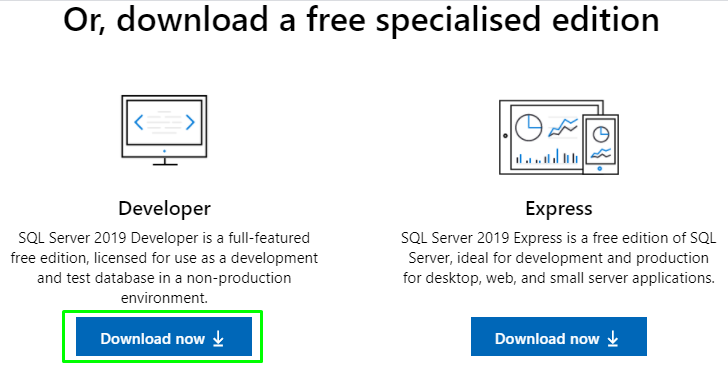
    Go to the Microsoft’s official download page for SQL Server. There you need to click on the Download now button under Developer or Express. You can choose any type you need.


    Step 2: 

    After the installer is downloaded, click on the exe file downloaded to start the installation process.

    Step 3:

    Now setup will start, and ask for the type of installation. Three options are displayed for BasicCustom, and Download Media. Just click on Basic for quick and recommended installation to start.
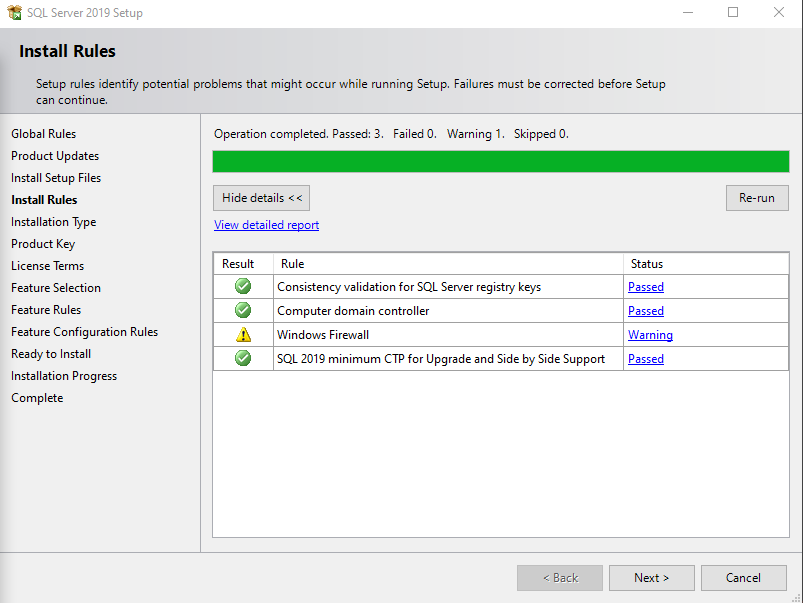
    Step 4:

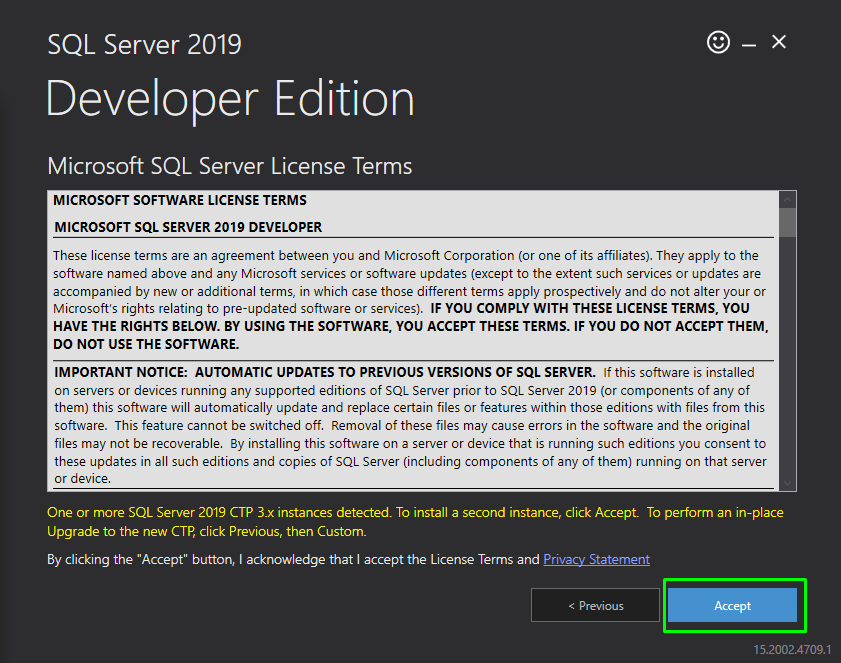
    Accept terms and conditions. Or you can read them first 🙂
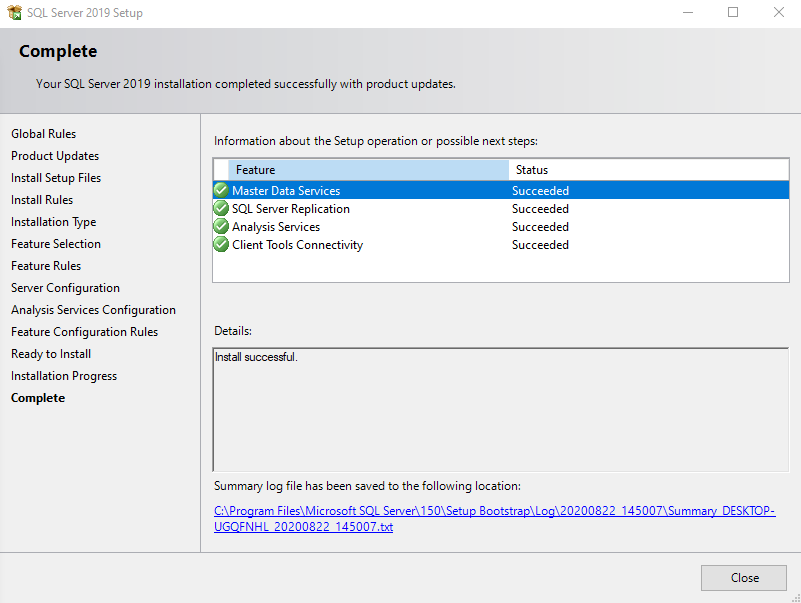
    Step 5: 

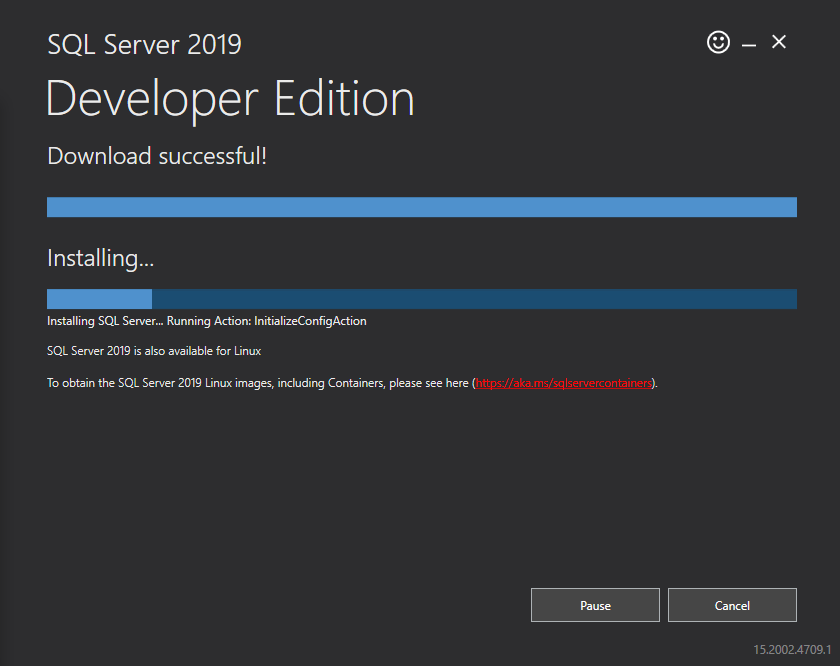
    After this step, the setup will start downloading and installation. it downloads around 1GB of data from online.


    Step 6: 

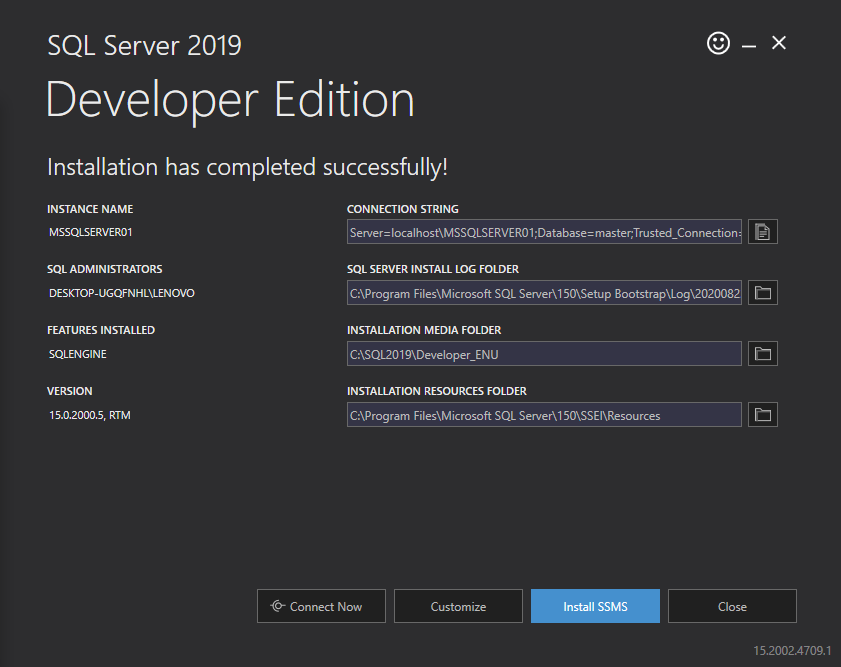
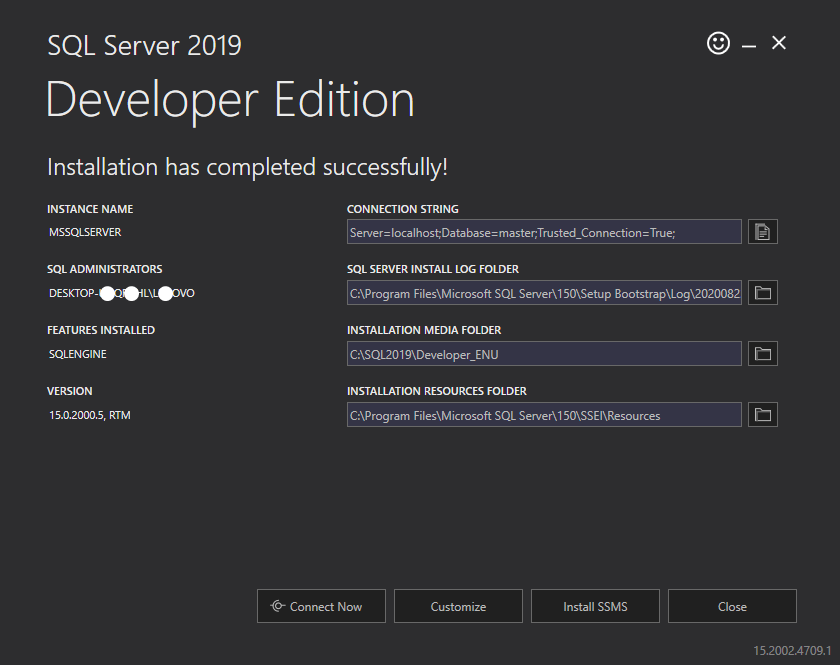
    After installation is complete, the following screen will be shown. There is a button “Install SSMS” to install SQL Server Management Studio. If don’t have already installed, in the next section we’ll learn how to install it.

    Otherwise, just click on “Customise


    Step 7:

    After clicking the “Customise” the screen will show steps to complete acting like a wizard.


    Step 8:

    After Custom installation is complete, click on the “Close” button.

    Now you have successfully installed the SQL Server 2019 on your Windows 10 OS.

    I hope this was helpful! 

    Friday, October 29, 2021

    Required if Validation in Laravel 6 with Example

     Required if Validation in Laravel 6 with Example

    hii guys,

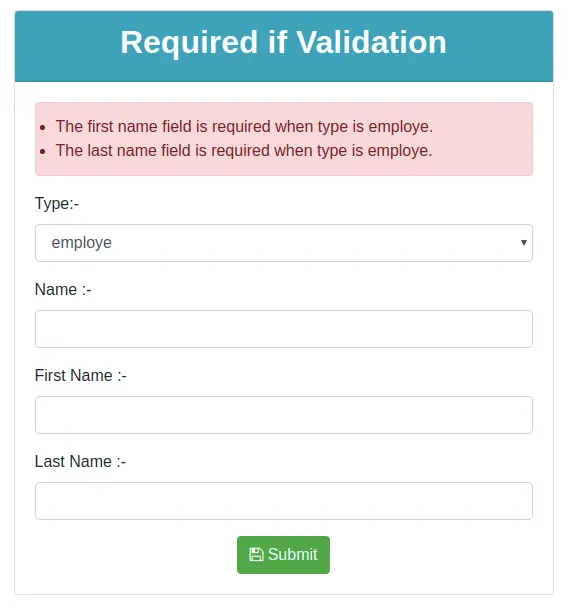
    In this example,I will learn you how to use required if validation in laravel 6 application. i will create simple example of laravel 6 required if validation.you can simply use to required if validation in your project.

    Controller Code

    you will create the method in TestController.php file.

    <?php

    namespace App\Http\Controllers;

    use Illuminate\Http\Request;

    class TestController extends Controller

    {

    public function index()

    {

    return view('img');

    }

    public function store(Request $request)

    {

    $input=$request->all();

    $request->validate([

    'type'=>'required',

    'name'=>'required_if:type,student',

    'first_name'=>'required_if:type,employe',

    'last_name'=>'required_if:type,employe',

    ]);

    return redirect()->back();

    }

    }

    Create View file

    you will create the index.php file in the views directory.

    <!DOCTYPE html>

    <html>

    <head>

    <title></title>

    <link rel="stylesheet" href="https://stackpath.bootstrapcdn.com/bootstrap/4.3.1/css/bootstrap.min.css" integrity="sha384-ggOyR0iXCbMQv3Xipma34MD+dH/1fQ784/j6cY/iJTQUOhcWr7x9JvoRxT2MZw1T" crossorigin="anonymous">

    <link rel="stylesheet" href="https://cdnjs.cloudflare.com/ajax/libs/font-awesome/4.7.0/css/font-awes

    <script src="https://code.jquery.com/jquery-3.3.1.slim.min.js" integrity="sha384-q8i/X+965DzO0rT7abK41JStQIAqVgRVzpbzo5smXKp4YfRvH+8abtTE1Pi6jizo" crossorigin="anonymous"></script>

    <script src="https://cdnjs.cloudflare.com/ajax/libs/popper.js/1.14.7/umd/popper.min.js" integrity="sha384-UO2eT0CpHqdSJQ6hJty5KVphtPhzWj9WO1clHTMGa3JDZwrnQq4sF86dIHNDz0W1" crossorigin="anonymous"></script>

    <script src="https://stackpath.bootstrapcdn.com/bootstrap/4.3.1/js/bootstrap.min.js" integrity="sha384-JjSmVgyd0p3pXB1rRibZUAYoIIy6OrQ6VrjIEaFf/nJGzIxFDsf4x0xIM+B07jRM" crossorigin="anonymous"></script>

    </head>

    <body>

    <div class="container">

    <div class="row">

    <div class="col-md-6 offset-3">

    <div class="card mt-5">

    <div class="card-header text-center bg-info">

    <h2 class="text-white"> <strong>Required if Validation</strong></h2>

    </div>

    <div class="card-body">

    @if (count($errors) > 0)

    <ul class="alert alert-danger">

    @foreach($errors->all() as $error)

    <li>{{ $error }}</li>

    @endforeach

    </ul>

    @endif

    <form action="{{ route('image.store') }}" method="post">

    @csrf

    <div class="form-group">

    <label>Type:- </label>

    <select name="type" class="form-control">

    <option value="">--select type--</option>

    <option value="student" @if(old('type') == "student") {{ 'selected' }} @endif >student</option>

    <option value="employe" @if(old('type') == "employe") {{ 'selected' }} @endif>employe</option>

    </select>

    </div>

    <div class="form-group">

    <label>Name :- </label>

    <input type="text" name="name" class="form-control">

    </div>

    <div class="form-group">

    <label>First Name :- </label>

    <input type="text" name="first_name" class="form-control">

    </div>

    <div class="form-group">

    <label>Last Name :- </label>

    <input type="text" name="last_name" class="form-control">

    </div>

    <div class="text-center">

    <button class="btn btn-success"><i class="fa fa-floppy-o" aria-hidden="true"></i> Submit </button>

    </div>

    </form>

    </div>

    </div>

    </div>

    </div>

    </div>

    </body>

    </html>

    It will help you....


    How to register multiple implementations of the same interface in Asp.Net Core?

     Problem: I have services that are derived from the same interface. public interface IService { } public class ServiceA : IService { ...