Sunday, April 19, 2020

What is UNIT TESTING in Asp.Net. Explain with Example.

In this tutorial, you will learn-
  • Introduction to testing for ASP.Net
  • Creating a .NET Unit Testing Project
  • Running the Test Project

Introduction to testing for ASP.Net

The first level of testing an ASP.Net project is unit level testing. This test is the functionality of an application. The testing is conducted to ensure that the application behaves as expected. In ASP.Net, the first task is to create a test project in Visual Studio. The test project will contain the necessary code to test the application.
Let's consider the below web page. In the page, we have the message "Guru99 – ASP.Net" displayed. Now how can we confirm that the correct message is displayed when an ASP.Net project runs. This is done by adding a test project to the ASP.Net solution (used to develop web-based applications). This test project would ensure that the right message is displayed to the user.
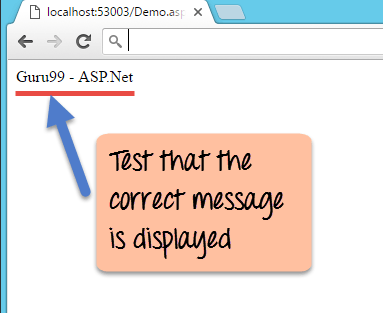
How to Create and Run Asp.Net Unit Testing Project
Let's look into more detail now and see how we can work on testing in ASP.Net.

Creating a .NET Unit Testing Project

Before we create a test project, we need to perform the below high-level steps.
  1. Use our 'DemoApplication' used in the earlier sections. This will be our application which needs to be tested.
  2. We will add a new class to the DemoApplication. This class will contain a string called 'Guru99 – ASP.Net.' This string will be tested in our testing project.
  3. Finally, we will create a testing project. This is used to test the ASP.Net application.
So let's follow the above high-level steps and see how to implement testing.
Step 1) Ensure the DemoApplication is open in Visual Studio.
Step 2) Let's now add a new class to the DemoApplication. This class will contain a string called 'Guru99 – ASP.Net.' This string will be tested in our testing project.
Follow below step to add a new class.
How to Create and Run Asp.Net Unit Testing Project
  1. In Visual Studio, right-click the 'DemoApplication' in the Solution Explorer.
  2. Choose the option Add->Class from the context menu.
Step 3) In this step,
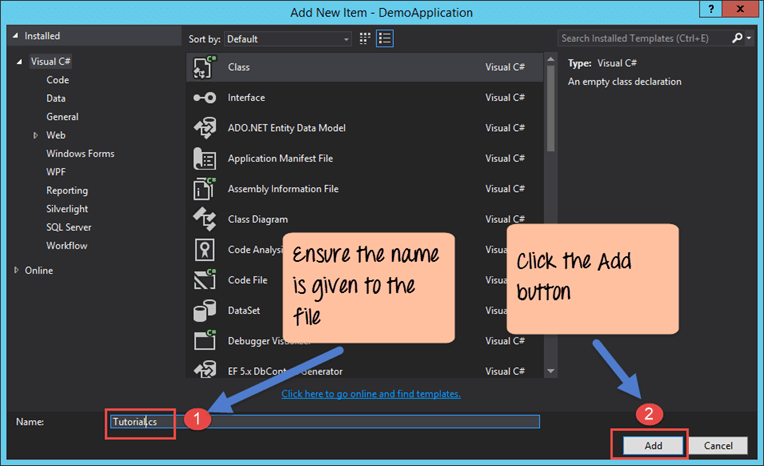
How to Create and Run Asp.Net Unit Testing Project

  1. Give a name 'Tutorial.cs' for the new class.
  2. Click the 'Add' button to add the file to the DemoApplication.
Now, a new class is added to file "DemoApplication."
Step 4) Open the new Tutorial.cs file from "DemoApplication". Add the string "Guru99 – ASP.Net."
To open the file, double-click on the Tutorial.cs file in the Solution Explorer.
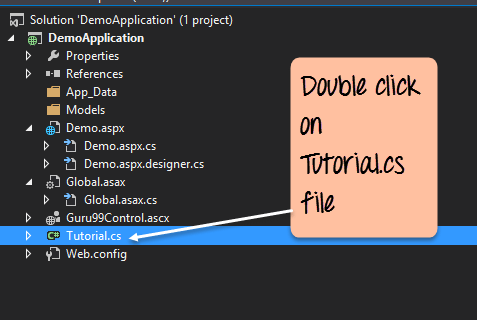
How to Create and Run Asp.Net Unit Testing Project
The file will have some default code already written. Do not bother about that code, just add the below line of code.
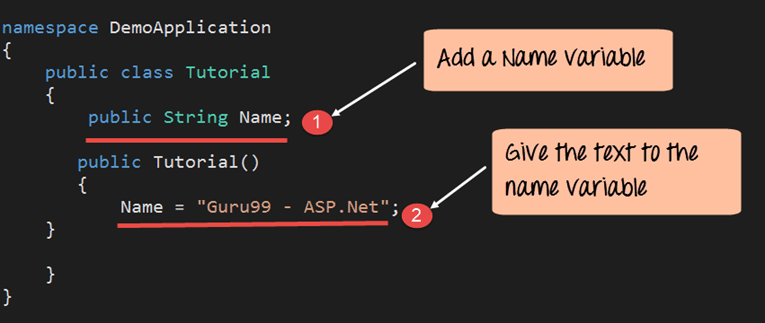
How to Create and Run Asp.Net Unit Testing Project
namespace DemoApplication
{  

  public class Tutorial
  {
     public String Name;
   public Tutorial()
   {
      Name = "Guru99 - ASP.Net";
   } 
  }
}
Code Explanation:-
  1. The Name variable is of type string.
  2. Finally in, the constructor of the Tutorial class, assign the value of the Name variable. The value is assigned to "Guru99 – ASP.Net"
Step 5) Now go to the demo.aspx file and add the lines of code to display the text "Guru99 – ASP.Net."
How to Create and Run Asp.Net Unit Testing Project
<!DOCTYPE html>
<html xmlns="http://www.w3.ore/1999/xhtml">
<head runat="server">
 <title></title>
</head> 
 <body>
 <form id="form1" runat="server”>
 <div>
  <% DemoApplication.Tutorial tp=new DemoApplication.Tutorial();%>

  <%=tp.Name%>
 </div>
 </form>
 </body>
</html>
Code Explanation:-
  1. The first line create's an object of the class 'Tutorial'. This is the first step when working with classes and objects. The name given to the object is 'tp'.
  2. Finally we call 'tutorial.cs' from demo.aspx file. It displays the value of the Name variable.
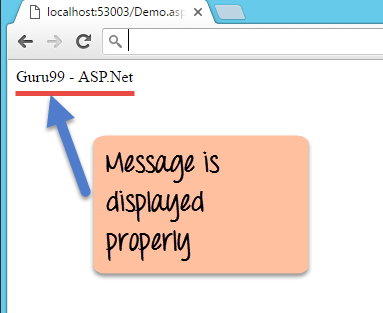
When you run the above program in Visual Studio, you will get the following output.
Output:-
How to Create and Run Asp.Net Unit Testing Project
From the output, you see the message "Guru99 – ASP.Net" displayed.
Step 6) Now let's add our test project to the Demo Application. This is done with the help of Visual Studio.
How to Create and Run Asp.Net Unit Testing Project
  1. Right-click the Solution – DemoApplication.
  2. In the context menu, choose the option 'New Project'.
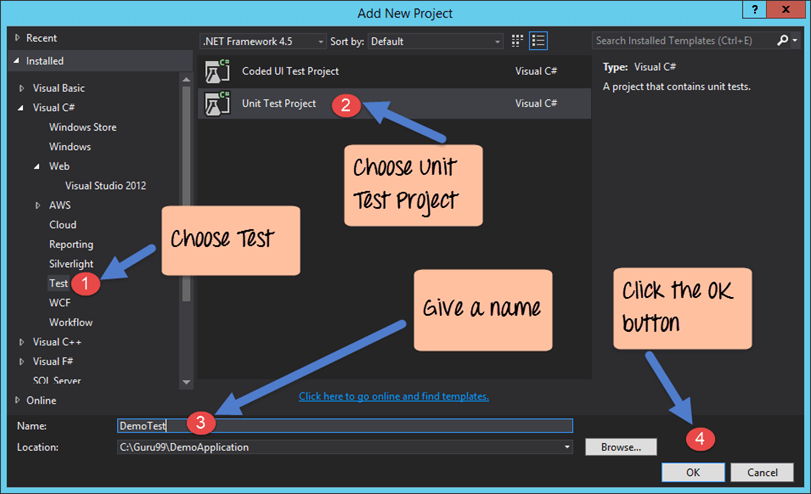
Step 7) The step involves the addition of the Unit Test project to the demo application.
How to Create and Run Asp.Net Unit Testing Project
  1. Click on item type as 'Test' from the left-hand panel.
  2. Choose the item as 'Unit Test Project' from the list, which appears in the center part of the dialog box.
  3. Give a name for the test project. In our case, the name given is 'DemoTest'.
  4. Finally, click the 'OK' button.
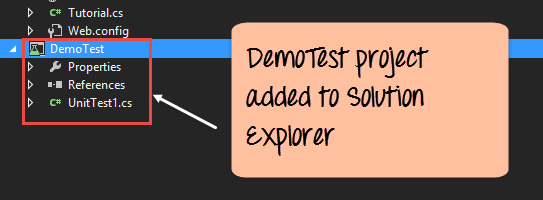
You will eventually see the DemoTest project added to the solution explorer. With this, you can also see other files like UnitTest1.cs, properties, etc. are generated by default.
How to Create and Run Asp.Net Unit Testing Project

Running the Test Project

The test project created in the earlier section is used to test our ASP.Net application. In the following steps, we are going to see how to run the Test project.
  • The first step would be to add a reference to the ASP.Net project. This step is carried out so that the test project has access to the ASP.Net project.
  • Then we will write our test code.
  • Finally, we will run the test using Visual Studio.
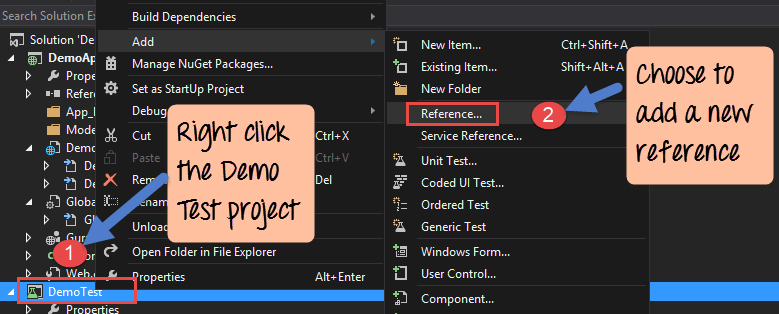
Step 1) To test our Demo Application, first test project needs to reference the Demo Application. Add a reference to the Demo.aspx solution.
How to Create and Run Asp.Net Unit Testing Project
  1. Right-click the Demo Test project
  2. From the menu choose the option of Add->Reference.
Step 2) The next step is to add a reference to the DemoApplication.
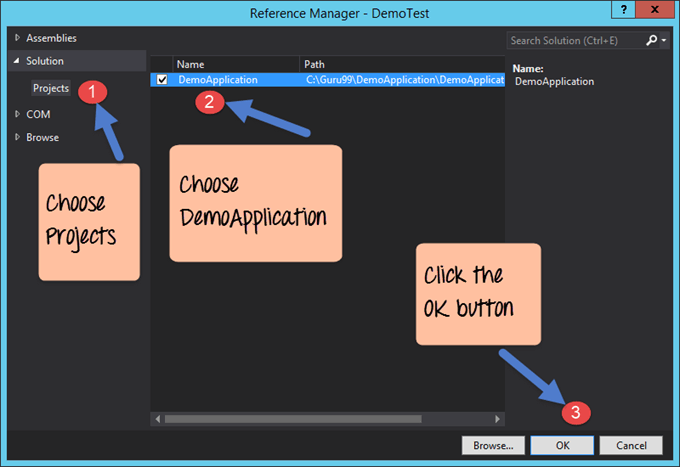
How to Create and Run Asp.Net Unit Testing Project
  1. Select the Projects option from the left-hand side of the dialog box
  2. Click on the check box next to DemoApplication
  3. Click on the 'OK' button.
This will allow a demotest project to test our DemoApplication.
Step 3) Now it's time to add the test code to our test project.
  • For this first double-click on the UnitTest1 (UnitTest1 file is automatically added by Visual Studio when the Test project is created) file in the Solution Explorer.
  • This is the file which will be run to test the ASP.Net project.
How to Create and Run Asp.Net Unit Testing Project
You will see the below code added by Visual Studio in the UnitTest1.cs file. This is the basic code needed for the test project to run.
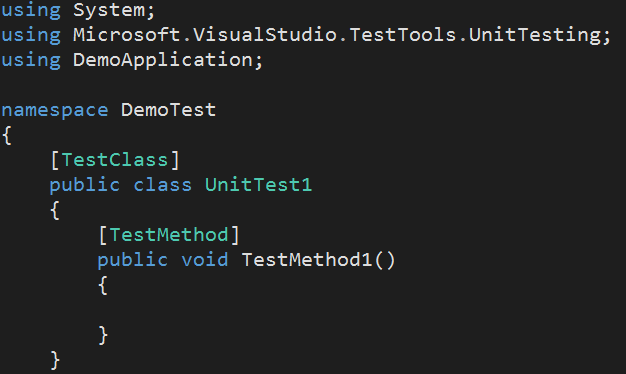
How to Create and Run Asp.Net Unit Testing Project
Step 4) The next step is to add the code which is used to test the string "Guru99 – ASP.Net."
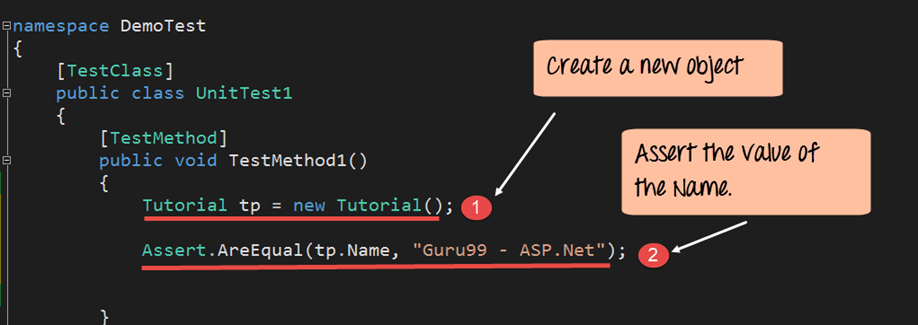
How to Create and Run Asp.Net Unit Testing Project
using System;
using Microsoft.VisualStudio.TestTools.UnitTesting; 
using DemoApplication;

namespace DemoTest
{
 [TestClass]
 public class UnitTestl
 {
   [TestMethod]
   public void TestMethodl()
   {
      Tutorial tp = new Tutorial();
   Assert.AreEqual(tp.Name,"Guru99 - ASP.Net");
   }
 }
}
  1. Create a new object called 'tp' of the type Tutorial
  2. The Assert.AreEqual method is used in .Net to test if a value is equal to something. So in our case, we are comparing the values of tp.Name to Guru99 – ASP.Net.
Step 5) Now let's run our test project. For this, we need to go to the menu option Test->Run->All Tests
How to Create and Run Asp.Net Unit Testing Project
Output:-
How to Create and Run Asp.Net Unit Testing Project
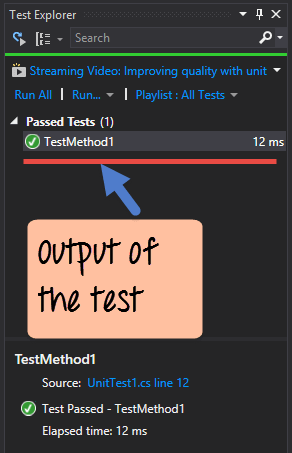
A test Explorer window will appear in Visual Studio. This will show the above result and display that a successful test was run in Visual Studio.
Wednesday, April 15, 2020

What is Node.js File System?

Node.js includes fs module to access physical file system. The fs module is responsible for all the asynchronous or synchronous file I/O operations.
Let's see some of the common I/O operation examples using fs module.

Reading File

Use fs.readFile() method to read the physical file asynchronously.
Signature:
fs.readFile(fileName [,options], callback)
Parameter Description:
  • filename: Full path and name of the file as a string.
  • options: The options parameter can be an object or string which can include encoding and flag. The default encoding is utf8 and default flag is "r".
  • callback: A function with two parameters err and fd. This will get called when readFile operation completes.
The following example demonstrates reading existing TestFile.txt asynchronously.
Example: Reading File
var fs = require('fs');

fs.readFile('TestFile.txt', function (err, data) {
                    if (err) throw err;

    console.log(data);
});
The above example reads TestFile.txt (on Windows) asynchronously and executes callback function when read operation completes. This read operation either throws an error or completes successfully. The err parameter contains error information if any. The data parameter contains the content of the specified file.
The following is a sample TextFile.txt file.
TextFile.txt
This is test file to test fs module of Node.js
Now, run the above example and see the result as shown below.
C:\> node server.js
This is test file to test fs module of Node.js

Use fs.readFileSync() method to read file synchronously as shown below.
Example: Reading File Synchronously
var fs = require('fs');

var data = fs.readFileSync('dummyfile.txt', 'utf8');
console.log(data);

Writing File

Use fs.writeFile() method to write data to a file. If file already exists then it overwrites the existing content otherwise it creates a new file and writes data into it.
Signature:
fs.writeFile(filename, data[, options], callback)
Parameter Description:
  • filename: Full path and name of the file as a string.
  • Data: The content to be written in a file.
  • options: The options parameter can be an object or string which can include encoding, mode and flag. The default encoding is utf8 and default flag is "r".
  • callback: A function with two parameters err and fd. This will get called when write operation completes.
The following example creates a new file called test.txt and writes "Hello World" into it asynchronously.
Example: Creating & Writing File
var fs = require('fs');

fs.writeFile('test.txt', 'Hello World!', function (err) { 
                        if (err)
        console.log(err);
                        else
        console.log('Write operation complete.');
});
In the same way, use fs.appendFile() method to append the content to an existing file.
Example: Append File Content
var fs = require('fs');

fs.appendFile('test.txt', 'Hello World!', function (err) { 
                        if (err)
        console.log(err);
                        else
        console.log('Append operation complete.');
});

Open File

Alternatively, you can open a file for reading or writing using fs.open() method.
Signature:
fs.open(path, flags[, mode], callback)
Parameter Description:
  • path: Full path with name of the file as a string.
  • Flag: The flag to perform operation
  • Mode: The mode for read, write or readwrite. Defaults to 0666 readwrite.
  • callback: A function with two parameters err and fd. This will get called when file open operation completes.

Flags

The following table lists all the flags which can be used in read/write operation.
FlagDescription
rOpen file for reading. An exception occurs if the file does not exist.
r+Open file for reading and writing. An exception occurs if the file does not exist.
rsOpen file for reading in synchronous mode.
rs+Open file for reading and writing, telling the OS to open it synchronously. See notes for 'rs' about using this with caution.
wOpen file for writing. The file is created (if it does not exist) or truncated (if it exists).
wxLike 'w' but fails if path exists.
w+Open file for reading and writing. The file is created (if it does not exist) or truncated (if it exists).
wx+Like 'w+' but fails if path exists.
aOpen file for appending. The file is created if it does not exist.
axLike 'a' but fails if path exists.
a+Open file for reading and appending. The file is created if it does not exist.
ax+Like 'a+' but fails if path exists.
The following example opens an existing file and reads its content.
Example:File open and read
var fs = require('fs');

fs.open('TestFile.txt', 'r', function (err, fd) {
    
                            if (err) {
                            return console.error(err);
    }
    
                            var buffr = new Buffer(1024);
    
    fs.read(fd, buffr, 0, buffr.length, 0, function (err, bytes) {
       
                            if (err) throw err;
            
                            // Print only read bytes to avoid junk.
                            if (bytes > 0) {
            console.log(buffr.slice(0, bytes).toString());
        }
        
                            // Close the opened file.
        fs.close(fd, function (err) {
                            if (err) throw err;
        });
    });
});

Delete File

Use fs.unlink() method to delete an existing file.
Signature:
fs.unlink(path, callback);
The following example deletes an existing file.
Example:File Open and Read
var fs = require('fs');

fs.unlink('test.txt', function () {
    
    console.log('write operation complete.');

});

Important method of fs module

MethodDescription
fs.readFile(fileName [,options], callback)Reads existing file.
fs.writeFile(filename, data[, options], callback)Writes to the file. If file exists then overwrite the content otherwise creates new file.
fs.open(path, flags[, mode], callback)Opens file for reading or writing.
fs.rename(oldPath, newPath, callback)Renames an existing file.
fs.chown(path, uid, gid, callback)Asynchronous chown.
fs.stat(path, callback)Returns fs.stat object which includes important file statistics.
fs.link(srcpath, dstpath, callback)Links file asynchronously.
fs.symlink(destination, path[, type], callback)Symlink asynchronously.
fs.rmdir(path, callback)Renames an existing directory.
fs.mkdir(path[, mode], callback)Creates a new directory.
fs.readdir(path, callback)Reads the content of the specified directory.
fs.utimes(path, atime, mtime, callback)Changes the timestamp of the file.
fs.exists(path, callback)Determines whether the specified file exists or not.
fs.access(path[, mode], callback)Tests a user's permissions for the specified file.
fs.appendFile(file, data[, options], callback)Appends new content to the existing file.
Visit Node documentation for more information on fs module.

Create Node.js Web Application in Visual Studio

Here, you will learn how to create a Node.js web application using Visual Studio.
If you have not installed the project templates for Node.js in Visual Studio, then visit the Setup Visual Studio section.
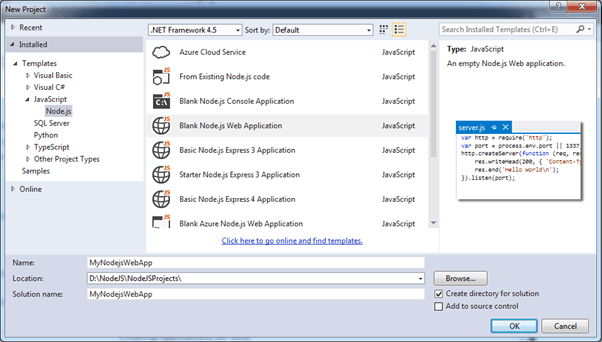
First of all, create a new project by clicking on New Project.. on the start page or FILE menu. This will open a New Project dialog box as shown below.
Select Node.js Template in Visual Studio
As shown in the above figure, from the New Project dialog box, expand Installed -> Templates -> JavaScript -> Node.js in the left pane. Select the Blank Node.js Web Application in the centre pane, enter a project name and a location and click OK. This will create a Node.js web application project as shown below.
Node.js web server project in Visual Studio
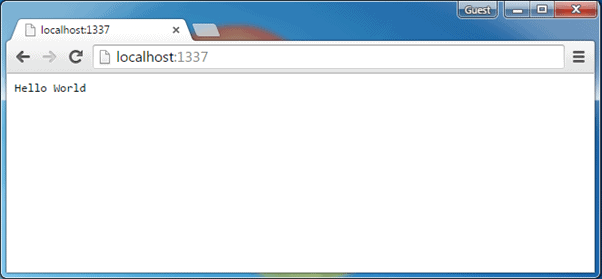
As you can see, it has created server.js, which creates a web server listening on the 1337 port and sends the "Hello World" text as a response to any http request.
Press F5 to run the web project. It will open the command prompt and the browser, as shown below.
Create Node.js web server using Visual Studio
Node.js Web Application
So now, you can send different responses based on the requested URLs the same way as shown in the Node.js web server section.

What is Node.js Web Server?

In this section, we will learn how to create a simple Node.js web server and handle HTTP requests.
To access web pages of any web application, you need a web server. The web server will handle all the http requests for the web application e.g IIS is a web server for ASP.NET web applications and Apache is a web server for PHP or Java web applications.
Node.js provides capabilities to create your own web server which will handle HTTP requests asynchronously. You can use IIS or Apache to run Node.js web application but it is recommended to use Node.js web server.

Create Node.js Web Server

Node.js makes it easy to create a simple web server that processes incoming requests asynchronously.
The following example is a simple Node.js web server contained in server.js file.
server.js
var http = require('http'); // 1 - Import Node.js core module

var server = http.createServer(function (req, res) {   // 2 - creating server

    //handle incomming requests here..

});

server.listen(5000); //3 - listen for any incoming requests

console.log('Node.js web server at port 5000 is running..')
In the above example, we import the http module using require() function. The http module is a core module of Node.js, so no need to install it using NPM. The next step is to call createServer() method of http and specify callback function with request and response parameter. Finally, call listen() method of server object which was returned from createServer() method with port number, to start listening to incoming requests on port 5000. You can specify any unused port here.
Run the above web server by writing node server.js command in command prompt or terminal window and it will display message as shown below.
C:\> node server.js
Node.js web server at port 5000 is running..

This is how you create a Node.js web server using simple steps. Now, let's see how to handle HTTP request and send response in Node.js web server.

Handle HTTP Request

The http.createServer() method includes request and response parameters which is supplied by Node.js. The request object can be used to get information about the current HTTP request e.g., url, request header, and data. The response object can be used to send a response for a current HTTP request.
The following example demonstrates handling HTTP request and response in Node.js.
server.js
var http = require('http'); // Import Node.js core module

var server = http.createServer(function (req, res) {   //create web server
    if (req.url == '/') { //check the URL of the current request
        
        // set response header
        res.writeHead(200, { 'Content-Type': 'text/html' }); 
        
        // set response content    
        res.write('<html><body><p>This is home Page.</p></body></html>');
        res.end();
    
    }
    else if (req.url == "/student") {
        
        res.writeHead(200, { 'Content-Type': 'text/html' });
        res.write('<html><body><p>This is student Page.</p></body></html>');
        res.end();
    
    }
    else if (req.url == "/admin") {
        
        res.writeHead(200, { 'Content-Type': 'text/html' });
        res.write('<html><body><p>This is admin Page.</p></body></html>');
        res.end();
    
    }
    else
        res.end('Invalid Request!');

});

server.listen(5000); //6 - listen for any incoming requests

console.log('Node.js web server at port 5000 is running..')
In the above example, req.url is used to check the url of the current request and based on that it sends the response. To send a response, first it sets the response header using writeHead() method and then writes a string as a response body using write() method. Finally, Node.js web server sends the response using end() method.
Now, run the above web server as shown below.
C:\> node server.js
Node.js web server at port 5000 is running..

To test it, you can use the command-line program curl, which most Mac and Linux machines have pre-installed.
curl -i http://localhost:5000
You should see the following response.
HTTP/1.1 200 OK
Content-Type: text/plain
Date: Tue, 8 Sep 2015 03:05:08 GMT
Connection: keep-alive
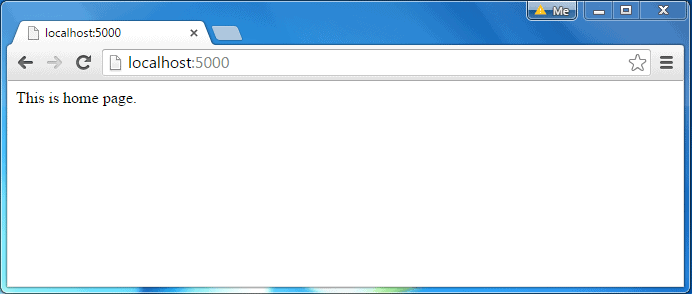
This is home page.

For Windows users, point your browser to http://localhost:5000 and see the following result.


Node.js Web Server Response

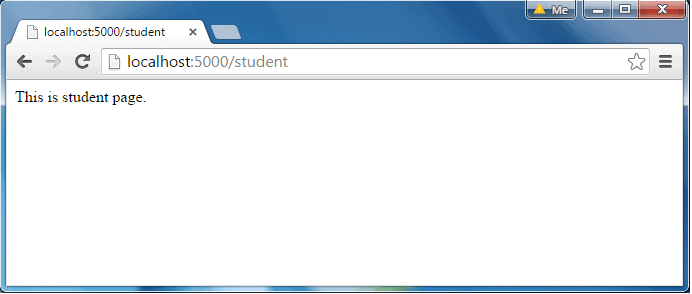
The same way, point your browser to http://localhost:5000/student and see the following result.


Node.js Web Server Response

It will display "Invalid Request" for all requests other than the above URLs.

Sending JSON Response

The following example demonstrates how to serve JSON response from the Node.js web server.
server.js
var http = require('http'); 

var server = http.createServer(function (req, res) {   
   
    if (req.url == '/data') { //check the URL of the current request
            res.writeHead(200, { 'Content-Type': 'application/json' });
            res.write(JSON.stringify({ message: "Hello World"}));  
            res.end();  
    }
});

server.listen(5000);

console.log('Node.js web server at port 5000 is running..')
So, this way you can create a simple web server that serves different responses.
Learn how to create Node.js Web Application in Visual Studio.

How to register multiple implementations of the same interface in Asp.Net Core?

 Problem: I have services that are derived from the same interface. public interface IService { } public class ServiceA : IService { ...