Indexes are used to speed-up query process in SQL Server, resulting in high performance. They are similar to textbook indexes. In textbooks, if you need to go to a particular chapter, you go to the index, find the page number of the chapter and go directly to that page. Without indexes, the process of finding your desired chapter would have been very slow.
The same applies to indexes in databases. Without indexes, a DBMS has to go through all the records in the table in order to retrieve the desired results. This process is called table-scanning and is extremely slow. On the other hand, if you create indexes, the database goes to that index first and then retrieves the corresponding table records directly.
There are two types of Indexes in SQL Server:
- Clustered Index
- Non-Clustered Index
Clustered Index
A clustered index defines the order in which data is physically stored in a table. Table data can be sorted in only way, therefore, there can be only one clustered index per table. In SQL Server, the primary key constraint automatically creates a clustered index on that particular column.
Let’s take a look. First, create a “student” table inside “schooldb” by executing the following script, or ensure that your database is fully backed up if you are using your live data:
CREATE DATABASE schooldb
CREATE TABLE student
(
id INT PRIMARY KEY,
name VARCHAR(50) NOT NULL,
gender VARCHAR(50) NOT NULL,
DOB datetime NOT NULL,
total_score INT NOT NULL,
city VARCHAR(50) NOT NULL
)
|
Notice here in the “student” table we have set primary key constraint on the “id” column. This automatically creates a clustered index on the “id” column. To see all the indexes on a particular table execute “sp_helpindex” stored procedure. This stored procedure accepts the name of the table as a parameter and retrieves all the indexes of the table. The following query retrieves the indexes created on student table.
USE schooldb
EXECUTE sp_helpindex student
|
The above query will return this result:
| index_name | index_description | index_keys |
| PK__student__3213E83F7F60ED59 | clustered, unique, primary key located on PRIMARY | id |
In the output you can see the only one index. This is the index that was automatically created because of the primary key constraint on the “id” column.
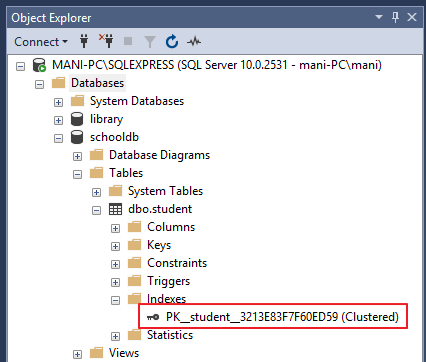
Another way to view table indexes is by going to “Object Explorer-> Databases-> Database_Name-> Tables-> Table_Name -> Indexes”. Look at the following screenshot for reference.

This clustered index stores the record in the student table in the ascending order of the “id”. Therefore, if the inserted record has the id of 5, the record will be inserted in the 5th row of the table instead of the first row. Similarly, if the fourth record has an id of 3, it will be inserted in the third row instead of the fourth row. This is because the clustered index has to maintain the physical order of the stored records according to the indexed column i.e. id. To see this ordering in action, execute the following script:
USE schooldb
INSERT INTO student
VALUES
(6, 'Kate', 'Female', '03-JAN-1985', 500, 'Liverpool'),
(2, 'Jon', 'Male', '02-FEB-1974', 545, 'Manchester'),
(9, 'Wise', 'Male', '11-NOV-1987', 499, 'Manchester'),
(3, 'Sara', 'Female', '07-MAR-1988', 600, 'Leeds'),
(1, 'Jolly', 'Female', '12-JUN-1989', 500, 'London'),
(4, 'Laura', 'Female', '22-DEC-1981', 400, 'Liverpool'),
(7, 'Joseph', 'Male', '09-APR-1982', 643, 'London'),
(5, 'Alan', 'Male', '29-JUL-1993', 500, 'London'),
(8, 'Mice', 'Male', '16-AUG-1974', 543, 'Liverpool'),
(10, 'Elis', 'Female', '28-OCT-1990', 400, 'Leeds');
|
The above script inserts ten records in the student table. Notice here the records are inserted in random order of the values in the “id” column. But because of the default clustered index on the id column, the records are physically stored in the ascending order of the values in the “id” column. Execute the following SELECT statement to retrieve the records from the student table.
USE schooldb
SELECT * FROM student
|
The records will be retrieved in the following order:
| id | name | gender | DOB | total_score | city |
| 1 | Jolly | Female | 1989-06-12 00:00:00.000 | 500 | London |
| 2 | Jon | Male | 1974-02-02 00:00:00.000 | 545 | Manchester |
| 3 | Sara | Female | 1988-03-07 00:00:00.000 | 600 | Leeds |
| 4 | Laura | Female | 1981-12-22 00:00:00.000 | 400 | Liverpool |
| 5 | Alan | Male | 1993-07-29 00:00:00.000 | 500 | London |
| 6 | Kate | Female | 1985-01-03 00:00:00.000 | 500 | Liverpool |
| 7 | Joseph | Male | 1982-04-09 00:00:00.000 | 643 | London |
| 8 | Mice | Male | 1974-08-16 00:00:00.000 | 543 | Liverpool |
| 9 | Wise | Male | 1987-11-11 00:00:00.000 | 499 | Manchester |
| 10 | Elis | Female | 1990-10-28 00:00:00.000 | 400 | Leeds |
Creating Custom Clustered Index
You can create your own custom index as well the default clustered index. To create a new clustered index on a table you first have to delete the previous index.
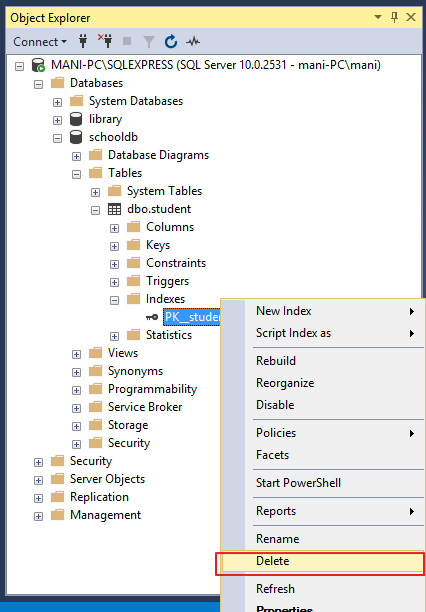
To delete an index go to “Object Explorer-> Databases-> Database_Name-> Tables-> Table_Name -> Indexes”. Right click the index that you want to delete and select DELETE. See the below screenshot.

Now, to create a new clustered Index, execute the following script:
use schooldb
CREATE CLUSTERED INDEX IX_tblStudent_Gender_Score
ON student(gender ASC, total_score DESC)
|
The process of creating clustered index is similar to a normal index with one exception. With clustered index, you have to use the keyword “CLUSTERED” before “INDEX”.
The above script creates a clustered index named “IX_tblStudent_Gender_Score” on the student table. This index is created on the “gender” and “total_score” columns. An index that is created on more than one column is called “composite index”.
The above index first sorts all the records in the ascending order of the gender. If gender is same for two or more records, the records are sorted in the descending order of the values in their “total_score” column. You can create a clustered index on a single column as well. Now if you select all the records from the student table, they will be retrieved in the following order:
| id | name | gender | DOB | total_score | city |
| 3 | Sara | Female | 1988-03-07 00:00:00.000 | 600 | Leeds |
| 1 | Jolly | Female | 1989-06-12 00:00:00.000 | 500 | London |
| 6 | Kate | Female | 1985-01-03 00:00:00.000 | 500 | Liverpool |
| 4 | Laura | Female | 1981-12-22 00:00:00.000 | 400 | Liverpool |
| 10 | Elis | Female | 1990-10-28 00:00:00.000 | 400 | Leeds |
| 7 | Joseph | Male | 1982-04-09 00:00:00.000 | 643 | London |
| 2 | Jon | Male | 1974-02-02 00:00:00.000 | 545 | Manchester |
| 8 | Mice | Male | 1974-08-16 00:00:00.000 | 543 | Liverpool |
| 5 | Alan | Male | 1993-07-29 00:00:00.000 | 500 | London |
| 9 | Wise | Male | 1987-11-11 00:00:00.000 | 499 | Manchester |
Non-Clustered Indexes
A non-clustered index doesn’t sort the physical data inside the table. In fact, a non-clustered index is stored at one place and table data is stored in another place. This is similar to a textbook where the book content is located in one place and the index is located in another. This allows for more than one non-clustered index per table.
It is important to mention here that inside the table the data will be sorted by a clustered index. However, inside the non-clustered index data is stored in the specified order. The index contains column values on which the index is created and the address of the record that the column value belongs to.
When a query is issued against a column on which the index is created, the database will first go to the index and look for the address of the corresponding row in the table. It will then go to that row address and fetch other column values. It is due to this additional step that non-clustered indexes are slower than clustered indexes.
Creating a Non-Clustered Index
The syntax for creating a non-clustered index is similar to that of clustered index. However, in case of non-clustered index keyword “NONCLUSTERED” is used instead of “CLUSTERED”. Take a look at the following script.
use schooldb
CREATE NONCLUSTERED INDEX IX_tblStudent_Name
ON student(name ASC)
|
The above script creates a non-clustered index on the “name” column of the student table. The index sorts by name in ascending order. As we said earlier, the table data and index will be stored in different places. The table records will be sorted by a clustered index if there is one. The index will be sorted according to its definition and will be stored separately from the table.
Student Table Data:
| id | name | gender | DOB | total_score | City |
| 1 | Jolly | Female | 1989-06-12 00:00:00.000 | 500 | London |
| 2 | Jon | Male | 1974-02-02 00:00:00.000 | 545 | Manchester |
| 3 | Sara | Female | 1988-03-07 00:00:00.000 | 600 | Leeds |
| 4 | Laura | Female | 1981-12-22 00:00:00.000 | 400 | Liverpool |
| 5 | Alan | Male | 1993-07-29 00:00:00.000 | 500 | London |
| 6 | Kate | Female | 1985-01-03 00:00:00.000 | 500 | Liverpool |
| 7 | Joseph | Male | 1982-04-09 00:00:00.000 | 643 | London |
| 8 | Mice | Male | 1974-08-16 00:00:00.000 | 543 | Liverpool |
| 9 | Wise | Male | 1987-11-11 00:00:00.000 | 499 | Manchester |
| 10 | Elis | Female | 1990-10-28 00:00:00.000 | 400 | Leeds |
IX_tblStudent_Name Index Data
| name | Row Address |
| Alan | Row Address |
| Elis | Row Address |
| Jolly | Row Address |
| Jon | Row Address |
| Joseph | Row Address |
| Kate | Row Address |
| Laura | Row Address |
| Mice | Row Address |
| Sara | Row Address |
| Wise | Row Address |
Notice, here in the index every row has a column that stores the address of the row to which the name belongs. So if a query is issued to retrieve the gender and DOB of the student named “Jon”, the database will first search the name “Jon” inside the index. It will then read the row address of “Jon” and will go directly to that row in the “student” table to fetch gender and DOB of Jon.

No comments:
Post a Comment